

FrankMD
FrankMD (Frank Markdown) is a self-hosted markdown note-taking app built with Ruby on Rails 8.
The name honors Frank Rosenblatt, inventor of the Perceptron, an early neural network.
fed (frank editor) is the command-line alias.

Why FrankMD?
- No database - Notes are plain markdown files on your filesystem
- Self-hosted - Your data stays on your machine or server
- Docker-ready - One command to start writing
- Blog-friendly - Draft posts with live preview
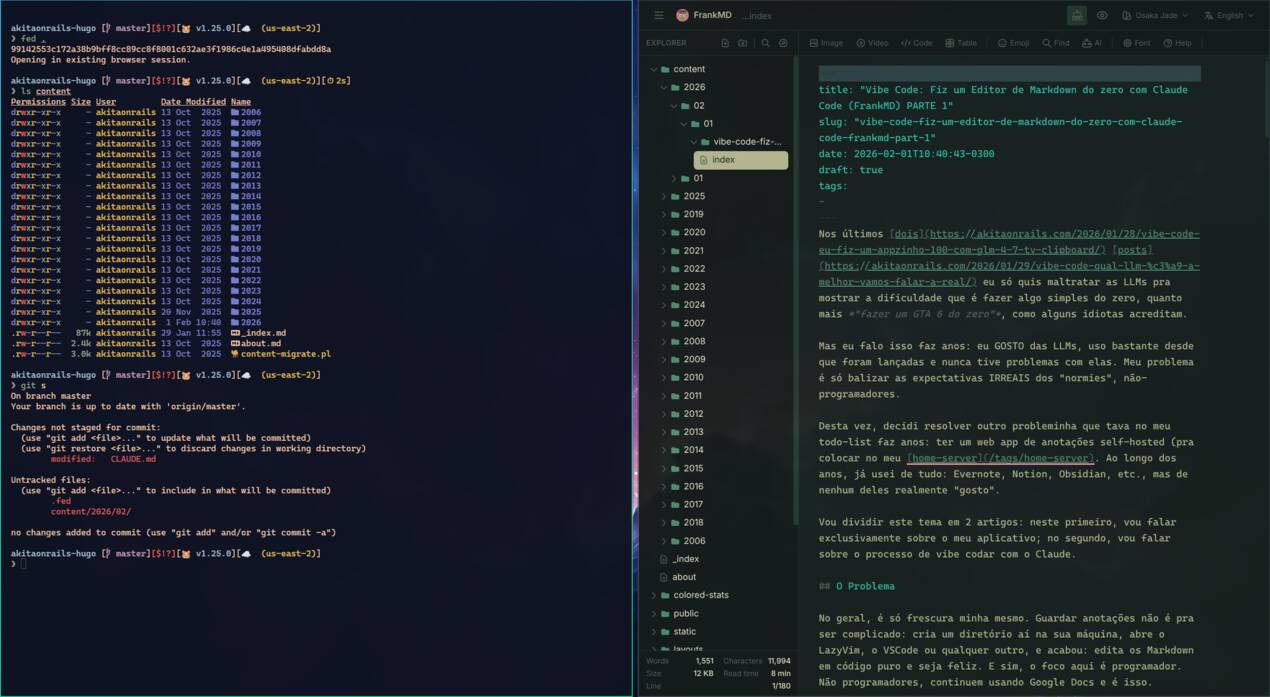
FrankMD running as a desktop app with fed . command
Features
Editor
- Clean, distraction-free writing interface
- Syntax highlighting for markdown
- Auto-save with visual feedback
- Typewriter mode for focused writing (cursor stays centered)
- Optional Vim mode (modal editing,
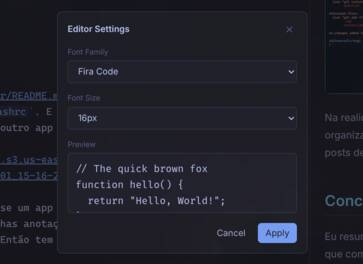
:ex-commands) — off by default - Customizable fonts and sizes
- Multiple color themes (light/dark variants)
Data Safety
- Offline detection: When the server becomes unreachable, FrankMD disables the editor and shows a warning banner to prevent edits that can't be saved. A "Retry" button lets you manually re-check. The editor re-enables automatically once the connection is restored.
- Content loss protection: If you accidentally delete a large portion of your note (more than 20% and 50+ characters), a warning banner appears with "Undo" and "Save Anyway" buttons, giving you a chance to recover before the deletion is saved.
- Offline backup: While you're editing, FrankMD periodically saves your work to the browser's local storage as a safety net.
- Recovery dialog: If the app detects that a local backup differs from the saved version (e.g., after a crash or lost connection), it shows a side-by-side diff so you can choose to keep the server version or restore the backup.
Organization
- Nested folder structure with context menu (right-click to create new notes or folders)
- Drag and drop files and folders
- Quick file finder (
Ctrl+P) sorted by recency - Full-text search with regex support (
Ctrl+Shift+F) - Find and replace with regex support (
Ctrl+H) - Hugo blog post support - Create posts with proper directory structure
- Wikilinks and backlinks -
[[Note Title]]syntax links to other notes; each note lists which other notes link back to it
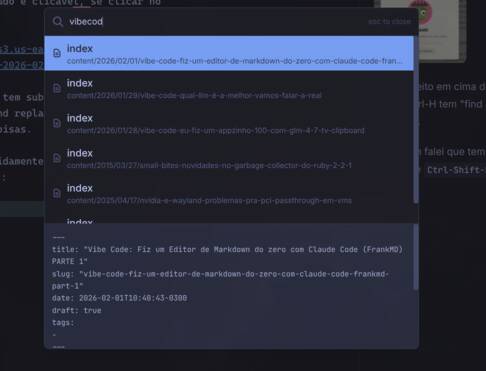
Quick file finder with fuzzy search (Ctrl+P)
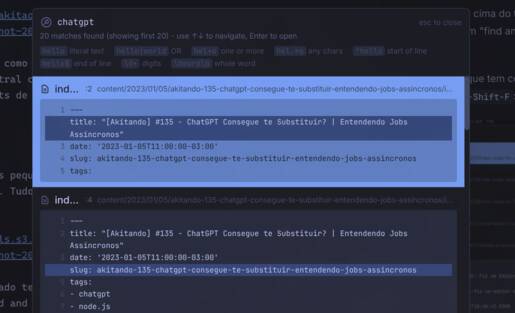
Full-text search with regex support (Ctrl+Shift+F)
Find and replace with regex support (Ctrl+H)
Preview
- Live markdown preview panel
- Synchronized scrolling (including typewriter mode)
- Zoom controls
- GitHub-flavored markdown support
- Copy button on rendered code blocks
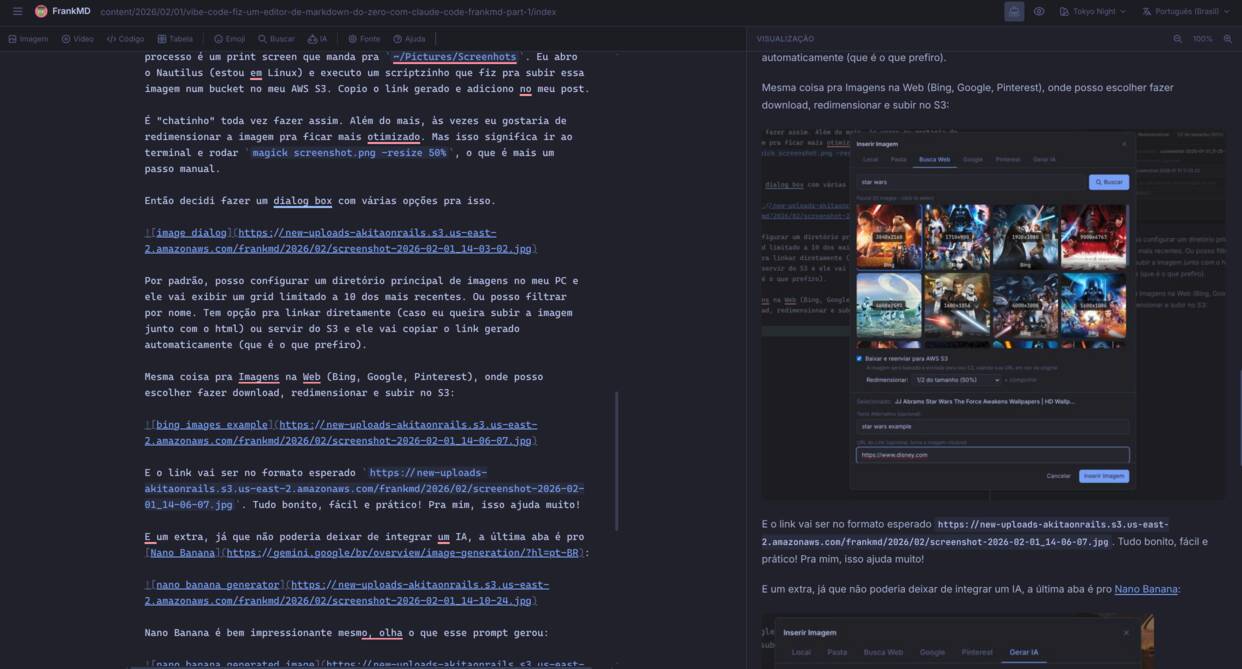
Live preview with synchronized scrolling
Media
- Images: Browse local images, search web (DuckDuckGo), Google Images, Pinterest, or generate with AI
- Videos: Embed YouTube videos with search, or local video files
- Tables: Visual table editor with drag-and-drop rows/columns
- Code blocks: Language selection with autocomplete
- Emoji & Emoticons: Quick picker with search
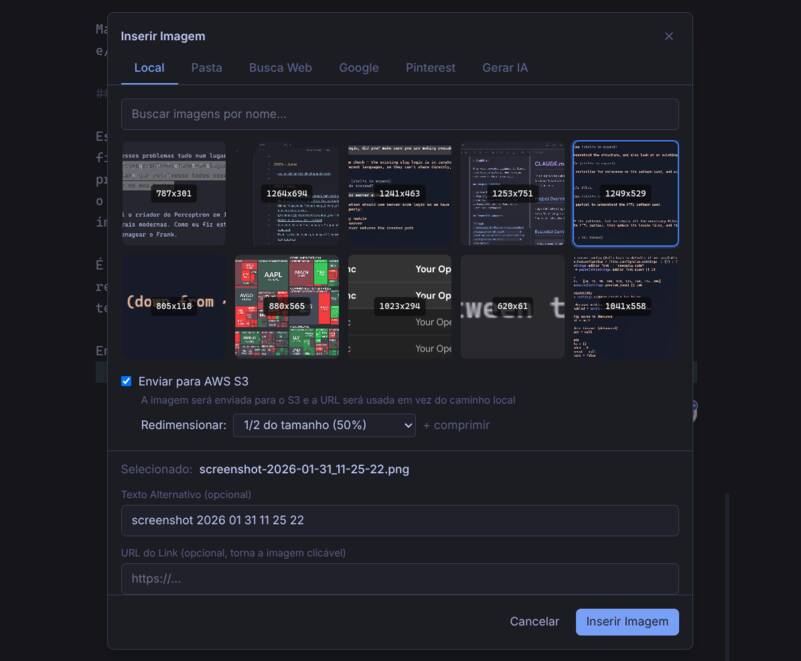
Browse local images from your filesystem
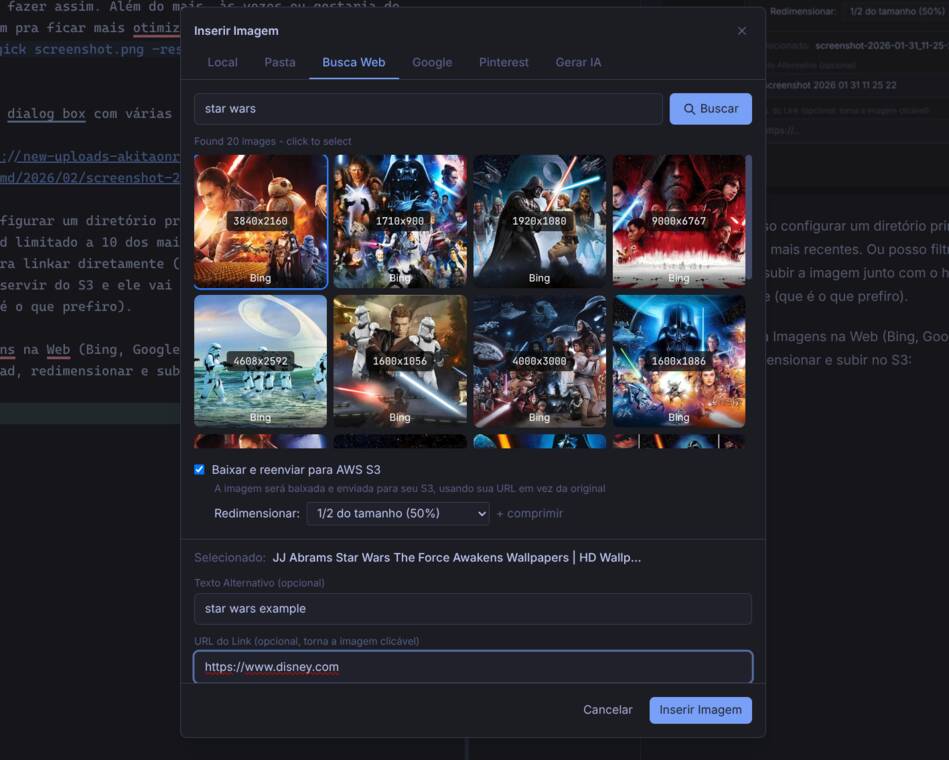
Search images from the web (DuckDuckGo, Google, Pinterest)
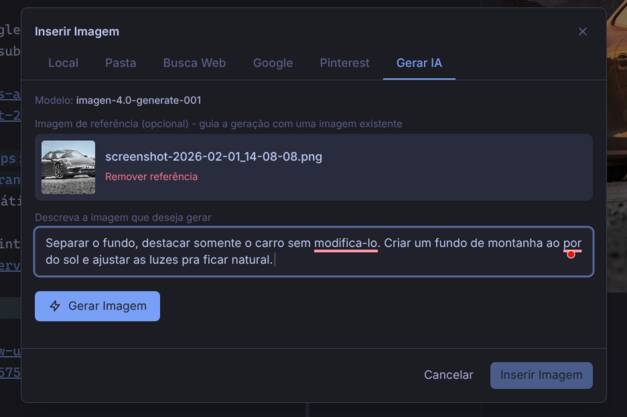
Generate images with AI (requires configured AI provider)
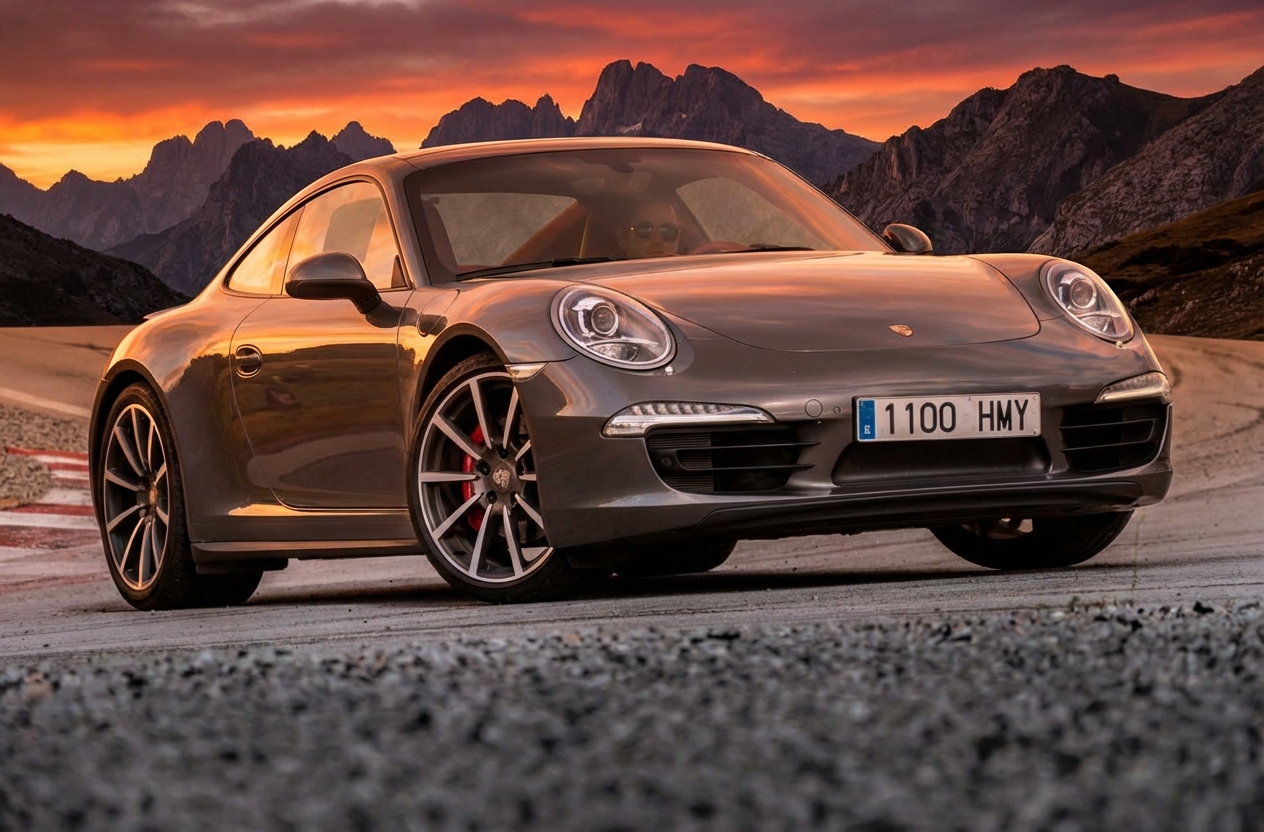
Example AI-generated image: "nano banana"
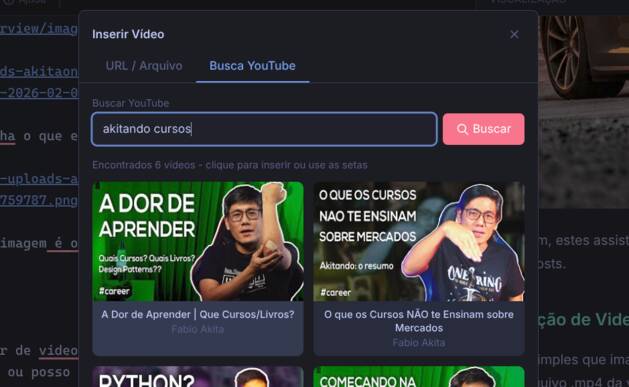
Search and embed YouTube videos
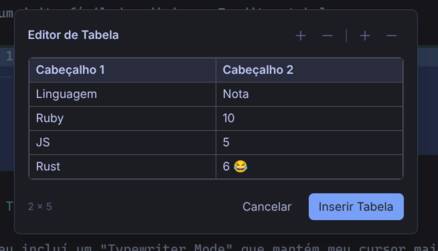
Visual markdown table editor
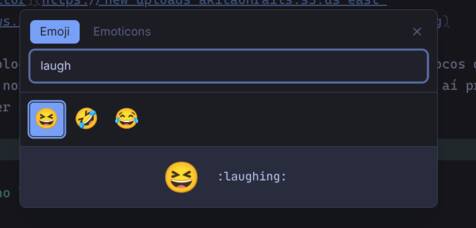
Emoji picker with search
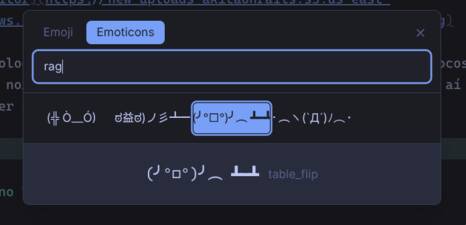
Emoticon picker
AI Features
- Grammar Check: AI-powered grammar, spelling, and typo correction
- Side-by-side diff view with original and corrected text
- Editable corrections before accepting changes
- Supports Ollama (local), OpenAI, Anthropic, Gemini, and OpenRouter
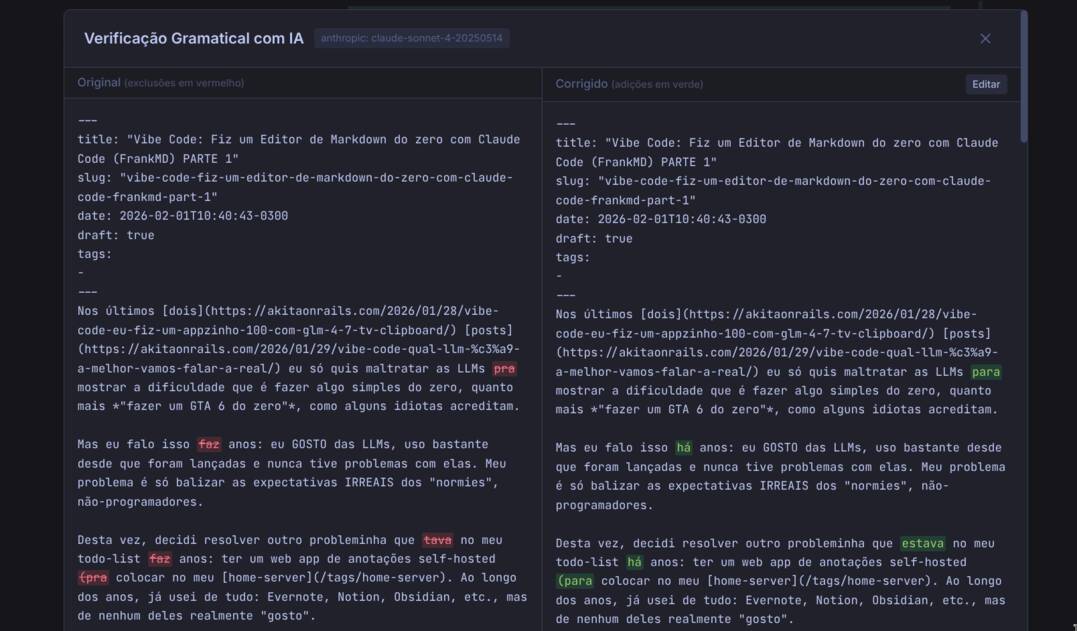
AI grammar checker with side-by-side diff view
Internationalization
- 7 languages: English, Português (Brasil), Português (Portugal), Español, עברית (Hebrew), 日本語 (Japanese), 한국어 (Korean)
- Language picker in the header
- Persistent preference saved to configuration
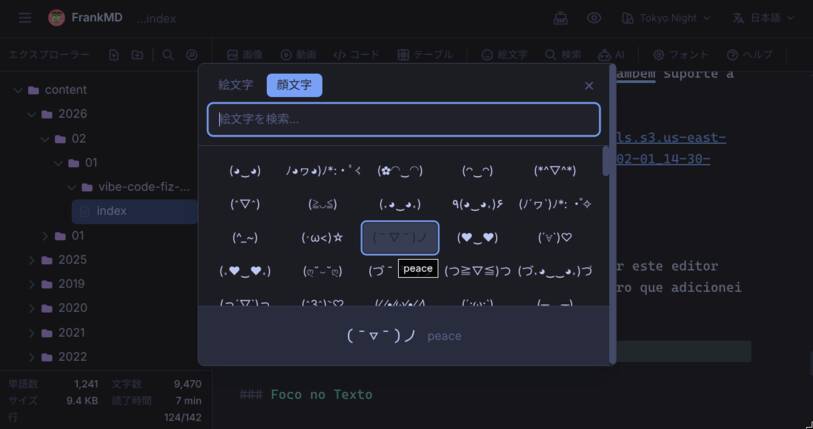
Full interface localization (Japanese example)
Integrations
- AWS S3 for image hosting (optional)
- YouTube API for video search (optional)
- Google Custom Search for image search (optional)
- AI/LLM providers for grammar checking (optional)
Quick Start
1. Install
curl -sL https://raw.githubusercontent.com/akitaonrails/FrankMD/master/install.sh | bashThen add to your shell config:
# bash/zsh - add to ~/.bashrc or ~/.zshrc
source ~/.config/frankmd/fed.sh
fish - add to ~/.config/fish/config.fish
source ~/.config/frankmd/fed.fish
To update, run the curl command again.
2. Run
fed ~/my-notes    # open a specific directory
fed .             # open current directory
fed               # open current directory (same as above)
Available commands:
fed [path]- Open FrankMD with notes directoryfed-update- Check for and download updatesfed-stop- Stop the container
3. Configure API Keys (Optional)
For AI features, image hosting, and related integrations, create an env file:
cp ~/.config/frankmd/env.example ~/.config/frankmd/env
Edit ~/.config/frankmd/env with your API keys
bash/zsh - add to ~/.bashrc or ~/.zshrc
export FRANKMD_ENV=~/.config/frankmd/env
fish - add to ~/.config/fish/config.fish
set -gx FRANKMD_ENV ~/.config/frankmd/env
4. Browser (Optional)
FrankMD checks for browsers in this order: Chromium -> Firefox -> Brave -> Chrome -> Edge. The first one found is used. On Linux it looks for PATH commands; on macOS it also checks the matching .app bundles under /Applications/.
To override, set FRANKMD_BROWSER in your shell config:
# bash/zsh - add to ~/.bashrc or ~/.zshrc
export FRANKMD_BROWSER=brave           # or chromium, google-chrome, microsoft-edge, firefox
fish - add to ~/.config/fish/config.fish
set -gx FRANKMD_BROWSER brave
macOS - point at the binary inside the .app bundle if auto-detection misses it
export FRANKMD_BROWSER="/Applications/Google Chrome.app/Contents/MacOS/Google Chrome"
Firefox opens in a regular browser window (it has no Chromium-style app-window mode); use a Chromium-based browser for the borderless app experience.
Running in Background
To run as a persistent service:
# Create notes directory on the host
mkdir -p ~/notes
Start in background
docker run -d --name frankmd -p 7591:80 \
  -v ~/notes:/rails/notes \
  --restart unless-stopped \
  akitaonrails/frankmd:latest
Stop
docker stop frankmd
Start again
docker start frankmd
Remove
docker rm -f frankmd
Tip: If you hit permission errors, run the container as your user (--user "$(id -u):$(id -g)") or rebuild the image with matching UID/GID.
Using Docker Compose
For a more permanent setup, use the docker-compose.yml in this repo:
Quick reference (full file in docker-compose.yml):
services:
  frankmd:
    image: akitaonrails/frankmd:latest
    container_name: frankmd
    restart: unless-stopped
    ports:
      - "7591:80"
    volumes:
      - ./notes:/rails/notes
    environment:
      - SECRET_KEY_BASE=${SECRET_KEY_BASE}
# Copy defaults and set required values
cp .env.example .env
Set in .env:
SECRET_KEY_BASE=$(openssl rand -hex 64)
UID=$(id -u)
GID=$(id -g)
Ensure notes directory exists (or create your NOTES_PATH target)
mkdir -p notes
Start
docker compose up -dNote: The host directory in NOTES_PATH must exist and be writable by the UID/GID in .env. Avoid sudo docker, which creates root-owned bind mounts; if that happens, fix ownership with chown -R UID:GID .
Configuration
FrankMD uses a .fed configuration file in your notes directory. This file is automatically created on first run with all options commented out as documentation.
The .fed File
When you open a notes directory for the first time, FrankMD creates a .fed configuration file with all available options commented out. You can uncomment and modify any setting:
# UI Settings
theme = gruvbox
locale = en
editor_font = fira-code
editor_font_size = 16
preview_zoom = 100
sidebar_visible = true
typewriter_mode = false
Local images path
images_path = /home/user/Pictures
AWS S3 (overrides environment variables)
aws_access_key_id = your-key
aws_secret_access_key = your-secret
aws_s3_bucket = your-bucket
aws_region = us-east-1
S3-compatible services (MinIO, SeaweedFS, ...) — optional
aws_s3_endpoint = http://localhost:9000
aws_s3_force_path_style = true
API Keys
youtube_api_key = your-youtube-key
google_api_key = your-google-key
google_cse_id = your-cse-id
AI/LLM (configure one or more providers)
ai_provider = auto
ollama_api_base = http://localhost:11434/v1
ollama_model = llama3.2:latest
openrouter_api_key = sk-or-...
openrouter_model = openai/gpt-4o-mini
anthropic_api_key = sk-ant-...
anthropic_model = claude-sonnet-4-20250514
gemini_api_key = ...
gemini_model = gemini-2.0-flash
openai_api_key = sk-...
openai_model = gpt-4o-mini
Priority order: File settings override environment variables. Environment variables override defaults.
That lets you:
- Set global defaults via environment variables
- Override per-folder using
.fed(e.g., different AWS bucket for different projects) - Save UI changes (theme, font) back to the file
.fed, ALL AI environment variables are ignored. See Per-Folder AI Configuration for details.
Editing .fed in the App
The .fed file appears in the explorer panel with a gear icon. You can click it to edit directly in FrankMD:
- The toolbar and preview panel are hidden when editing config files (they only appear for markdown files)
- Changes are auto-saved like any other file
- Live reload: When you save
.fed, the UI immediately applies your changes (theme, font, etc.)
Available Settings
| Setting | Type | Default | Description |
|---------|------|---------|-------------|
| theme | string | (system) | Color theme: light, dark, gruvbox, tokyo-night, etc. |
| locale | string | en | Language: en, pt-BR, pt-PT, es, he, ja, ko |
| editor_font | string | cascadia-code | Editor font family |
| editor_font_size | integer | 14 | Font size in pixels (8-32) |
| preview_zoom | integer | 100 | Preview zoom percentage (50-200) |
| sidebar_visible | boolean | true | Show explorer panel on startup |
| typewriter_mode | boolean | false | Enable typewriter mode on startup |
| vim_mode | boolean | false | Enable Vim mode on startup |
| images_path | string | - | Local images directory path |
| image_upload_extensions | string | .jpg,.jpeg,.png,.gif,.webp,.bmp | Comma-separated file extensions accepted by the image drag-and-drop upload |
| video_upload_extensions | string | .mp4,.webm,.mkv,.mov,.avi,.m4v,.ogv | Comma-separated file extensions accepted by the video drag-and-drop upload |
| aws_access_key_id | string | - | AWS access key for S3 |
| aws_secret_access_key | string | - | AWS secret key for S3 |
| aws_s3_bucket | string | - | S3 bucket name |
| aws_region | string | - | AWS region |
| aws_s3_endpoint | string | - | Custom S3-compatible endpoint (MinIO, SeaweedFS, ...); leave unset for AWS |
| aws_s3_force_path_style | boolean | false | Use path-style URLs (bucket in the path); required by most self-hosted S3 services |
| youtube_api_key | string | - | YouTube Data API key |
| google_api_key | string | - | Google API key |
| google_cse_id | string | - | Google Custom Search Engine ID |
| ai_provider | string | auto | AI provider: auto, ollama, openrouter, anthropic, gemini, openai |
| ai_model | string | (per provider) | Override model for any provider |
| ollama_api_base | string | - | Ollama API base URL (e.g., http://localhost:11434/v1) |
| ollama_model | string | llama3.2:latest | Ollama model |
| openrouter_api_key | string | - | OpenRouter API key |
| openrouter_model | string | openai/gpt-4o-mini | OpenRouter model |
| anthropic_api_key | string | - | Anthropic API key |
| anthropic_model | string | claude-sonnet-4-20250514 | Anthropic model |
| gemini_api_key | string | - | Google Gemini API key |
| gemini_model | string | gemini-2.0-flash | Gemini model |
| openai_api_key | string | - | OpenAI API key |
| openai_model | string | gpt-4o-mini | OpenAI model |
Environment Variables
Environment variables are global defaults. Use them for Docker deployments or when all notes directories should share the same config.
| Variable | Description | Default |
|----------|-------------|---------|
| NOTES_PATH | Directory where notes are stored (must be writable by UID/GID when using Docker) | ./notes |
| IMAGES_PATH | Directory for local images | (disabled) |
| IMAGE_UPLOAD_EXTENSIONS | Comma-separated file extensions accepted by the image drag-and-drop upload | .jpg,.jpeg,.png,.gif,.webp,.bmp |
| VIDEO_UPLOAD_EXTENSIONS | Comma-separated file extensions accepted by the video drag-and-drop upload | .mp4,.webm,.mkv,.mov,.avi,.m4v,.ogv |
| FRANKMD_LOCALE | Default language (en, pt-BR, pt-PT, es, he, ja, ko) | en |
| SECRET_KEY_BASE | Rails secret key (required in production) | - |
Optional: Image Hosting (AWS S3)
To upload images to S3 instead of using local paths:
| Variable | Description |
|----------|-------------|
| AWS_ACCESS_KEY_ID | Your AWS access key |
| AWS_SECRET_ACCESS_KEY | Your AWS secret key |
| AWS_S3_BUCKET | S3 bucket name |
| AWS_REGION | AWS region (e.g., us-east-1) |
Optional: YouTube Search
To enable YouTube video search in the video dialog:
- Go to Google Cloud Console
- Create a project and enable "YouTube Data API v3"
- Create an API key under Credentials
YOUTUBE_API_KEY | Your YouTube Data API key |
In-app setup: You can also configure this directly in the .fed file:
youtube_api_key = your-youtube-api-keyWhen not configured, the YouTube Search tab shows setup instructions with a link to this documentation.
Optional: Google Image Search
To enable Google Images tab (in addition to the free web search):
- Go to Google Cloud Console
- Create a project and enable "Custom Search API"
- Create an API key under Credentials
- Go to Programmable Search Engine
- Create a search engine with "Search the entire web" enabled
- Enable "Image search" in settings
- Copy the Search Engine ID (cx value)
GOOGLE_API_KEY | Your Google API key |
| GOOGLE_CSE_ID | Your Custom Search Engine ID |
In-app setup: You can also configure this directly in the .fed file:
google_api_key = your-google-api-key
google_cse_id = your-custom-search-engine-id
When not configured, the Google Images tab shows setup instructions with a link to this documentation.
Note: Google Custom Search has a free tier of 100 queries/day.
Optional: AI Grammar Checking
FrankMD has an AI grammar and spelling checker. Click the "AI" button in the editor toolbar to check your text. It fixes grammar errors, spelling mistakes, typos, and punctuation while keeping your writing style and markdown formatting.
Supported Providers (priority order in auto mode):
- OpenAI - GPT models
- Anthropic - Claude models
- Google Gemini - Gemini models
- OpenRouter - Multiple providers, pay-per-use
- Ollama - Local, free, private
ai_provider = .
Option 1: Ollama (Local, Free, Recommended)
Run AI models locally on your machine with no API costs:
- Install Ollama from ollama.com
- Pull a model:
ollama pull llama3.2:latest - Configure in
.fed:
ollama_api_base = http://localhost:11434/v1
ollama_model = llama3.2:latest
Note for Docker users: Use host.docker.internal instead of localhost:
ollama_api_base = http://host.docker.internal:11434/v1Option 2: OpenRouter
Access multiple AI providers through one API:
- Get an API key from openrouter.ai
- Configure in
.fed:
openrouter_api_key = sk-or-...
openrouter_model = openai/gpt-4o-mini
Option 3: Anthropic (Claude)
Use Anthropic's Claude models:
- Get an API key from console.anthropic.com
- Configure in
.fed:
anthropic_api_key = sk-ant-...
anthropic_model = claude-sonnet-4-20250514
Option 4: Google Gemini
Use Google's Gemini models:
- Get an API key from aistudio.google.com
- Configure in
.fed:
gemini_api_key = ...
gemini_model = gemini-2.0-flash
Option 5: OpenAI
Use OpenAI's GPT models:
- Get an API key from platform.openai.com
- Configure in
.fed:
openai_api_key = sk-...
openai_model = gpt-4o-mini
Provider Selection
By default, FrankMD uses the first configured provider in priority order (OpenAI -> Anthropic -> Gemini -> OpenRouter -> Ollama). To force a specific provider:
ai_provider = anthropicTo override the model for any provider:
ai_model = claude-3-opus-20240229Per-Folder AI Configuration
Important: If you set ANY AI credential in .fed, ALL AI-related environment variables are ignored for that folder. This gives each folder its own AI configuration and bypasses your global ENV settings.
For example, if you have OPENAI_API_KEY and OPENROUTER_API_KEY set as environment variables, but add this to .fed:
anthropic_api_key = sk-ant-your-keyFrankMD will:
- Use only Anthropic (ignoring OpenAI and OpenRouter from ENV)
- Pick up changes immediately when you save
.fedfrom the editor
- Using different AI providers for different projects
- Testing new providers without changing your global config
- Overriding ENV vars set in Docker/shell profiles
Default Models
| Provider | Default Model | |----------|---------------| | Ollama | llama3.2:latest | | OpenRouter | openai/gpt-4o-mini | | Anthropic | claude-sonnet-4-20250514 | | Gemini | gemini-2.0-flash | | OpenAI | gpt-4o-mini |
Usage:
- Click the "AI" button in the toolbar while editing a note
- Review the side-by-side diff showing original and corrected text
- Edit the corrected text if needed
- Click "Accept Changes" to apply corrections
Keyboard Shortcuts
File Operations
| Shortcut | Action | |----------|--------| |Ctrl+N | New note |
| Ctrl+S | Save now |
| Ctrl+P | Find file by path |
| Ctrl+Shift+F | Search in file contents |
| Ctrl+F | Find in file |
| Ctrl+H | Find and replace |
| Ctrl+G | Go to line |
Editor
| Shortcut | Action | |----------|--------| |Ctrl+E | Toggle sidebar |
| Ctrl+Shift+V | Toggle preview panel |
| Ctrl+\ | Toggle typewriter mode |
| Ctrl+L | Toggle line numbers |
| Ctrl+Shift++ | Increase editor width |
| Ctrl+Shift+- | Decrease editor width |
| Tab | Indent line/block |
| Shift+Tab | Unindent block |
Text Formatting
| Shortcut | Action | |----------|--------| |Ctrl+B | Bold |
| Ctrl+I | Italic |
| Ctrl+M | Open text format menu |
| Ctrl+Shift+E | Emoji picker |
Help
| Shortcut | Action | |----------|--------| |F1 | Open help dialog |
| Escape | Close dialogs |
Typewriter Mode
Typewriter mode (Ctrl+\) keeps the editor centered for long writing sessions:
Normal mode (default):
- Explorer panel visible on the left
- Preview panel available
- Editor uses normal scrolling
- Explorer panel hidden
- Preview panel closed
- Editor centered horizontally on the screen
- Cursor stays centered in the middle of the editor (50% viewport height)
- As you type, the text scrolls to keep your writing position fixed
- Adjust editor width with
Ctrl+Shift++andCtrl+Shift+-
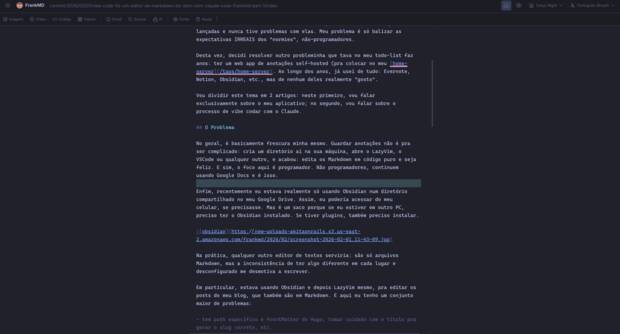
Typewriter mode: distraction-free writing with centered cursor
Vim Mode
Vim mode is off by default. Toggle it from the header button (the Vi glyph) or set vim_mode = true in your .fed file. When on, the editor uses modal editing (powered by the CodeMirror Vim keymap) with a status indicator showing the current mode. Existing app shortcuts (Ctrl+S, Ctrl+P, …) keep working alongside it.
Standard Vim motions and editing work (hjkl, w/b/e, d/c/y/p, v/V, /, n, ., counts, registers, macros, …). In addition, these : ex-commands map to FrankMD features:
| Command | Action |
|---|---|
| :w / :write | Save the note |
| :q / :quit | Close open menus / dialogs |
| :wq / :x | Save, then close menus |
| :e / :find | Open the file finder |
| :Explore | Toggle the sidebar |
| :n / :next | Open the next note |
| :prev | Open the previous note |
| :help | Open the in-app help (Vim tab) |
Notes autosave, so :w simply forces an immediate save. There is no Lua/plugin engine — this is modal editing and ex-commands only. See the Vim Mode tab in the in-app help (:help or F1) for the full reference.
On Windows and Linux, where FrankMD binds Ctrl, the shortcuts the app already owns stay with the app rather than Vim: Ctrl+F, Ctrl+N, Ctrl+P, Ctrl+E, Ctrl+B, Ctrl+I and Ctrl+V. Ctrl+D/Ctrl+U still page, and Ctrl+Q gives blockwise visual in place of Ctrl+V. macOS is unaffected, since app shortcuts use Cmd there.
This keeps your typing position steady on the page, which reduces eye movement during longer writing sessions.
Hugo Blog Post Support
FrankMD can create Hugo-compatible blog posts. When you click the "New Note" button (or press Ctrl+N), you can choose between:
- Empty Document - A plain markdown file
- Hugo Blog Post - A Hugo post with frontmatter
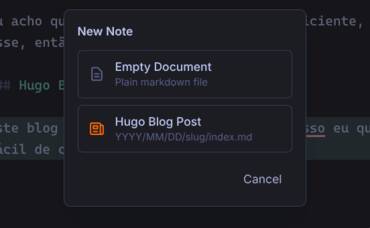
New note dialog with Hugo blog post option
Hugo Post Structure
When you create a Hugo blog post with a title like "My Amazing Post Title", FrankMD will:
- Create the directory structure:
YYYY/MM/DD/my-amazing-post-title/ - Create
index.mdinside with Hugo frontmatter:
---
title: "My Amazing Post Title"
slug: "my-amazing-post-title"
date: 2026-01-30T14:30:00-0300
draft: true
tags: []
---
Custom Frontmatter Template
To customize the generated frontmatter (add tags, extra fields, change formatting), create a .hugo_template.md file at the root of your notes directory. When present, its contents replace the built-in frontmatter. The following placeholders are substituted on each new post:
{{title}}: the post title (quotes escaped for use inside"..."){{slug}}: the generated slug{{date}}: the ISO 8601 creation date with timezone offset
---
title: "{{title}}"
slug: "{{slug}}"
date: {{date}}
draft: true
author: "Your Name"
tags:
  - uncategorized
categories: []
---
The file is hidden (dot-prefixed) so it won't appear in the notes tree. Remove it to fall back to the built-in template.
Flat Path Style
If you prefer to keep all posts in a single folder without date-based nesting, set hugo_path_style = flat in your .fed file:
hugo_path_style = flatWith flat style, creating a post titled "My Amazing Post Title" produces my-amazing-post-title.md in the current folder instead of the nested YYYY/MM/DD/slug/index.md structure. The frontmatter content remains the same.
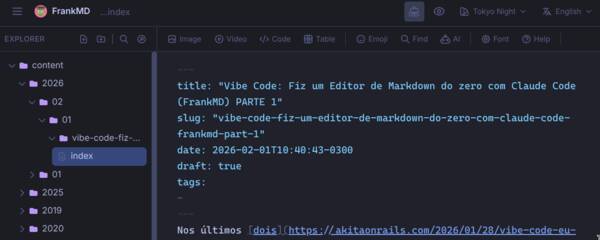
Hugo blog post with generated frontmatter
Slug Generation
The slug is automatically generated from the title:
- Converts to lowercase
- Replaces accented characters (a->a, e->e, c->c, n->n, etc.)
- Removes special characters
- Replaces spaces with hyphens
- "Conexao a Internet" ->
conexao-a-internet - "What's New in 2026?" ->
whats-new-in-2026 - "Codigo & Programacao" ->
codigo-programacao
Hugo YouTube Shortcode
When embedding YouTube videos, FrankMD can insert a Hugo shortcode ({{< youtube >}}) instead of raw HTML. Check the "Use Hugo shortcode" checkbox in the video dialog to enable this.
The inserted shortcode looks like:
{{< youtube id="dQw4w9WgXcQ" title="Video Title" >}}To use this in your Hugo blog, create the shortcode file at layouts/shortcodes/youtube.html in your Hugo project:
<div class="embed-container">
  <iframe
    src="https://www.youtube.com/embed/{{ .Get "id" }}"
    title="{{ with .Get "title" }}{{ . }}{{ else }}YouTube video player{{ end }}"
    frameborder="0"
    allow="accelerometer; autoplay; clipboard-write; encrypted-media; gyroscope; picture-in-picture; web-share"
    referrerpolicy="strict-origin-when-cross-origin"
    allowfullscreen>
  </iframe>
</div>
Then add the responsive CSS to your stylesheet (e.g. assets/css/custom.css or your theme's styles):
.embed-container {
  position: relative;
  padding-bottom: 56.25%; / 16:9 aspect ratio /
  height: 0;
  overflow: hidden;
  max-width: 100%;
}
.embed-container iframe {
  position: absolute;
  top: 0;
  left: 0;
  width: 100%;
  height: 100%;
}
Note: Hugo ships with a built-in youtube shortcode, but it uses a different syntax ({{< youtube dQw4w9WgXcQ >}} with a positional parameter). The custom shortcode above matches the named-parameter format (id="...", title="...") that FrankMD generates, and gives you full control over the markup and styling.
Themes
FrankMD ships with 18 built-in color themes, plus Omarchy theme sync:
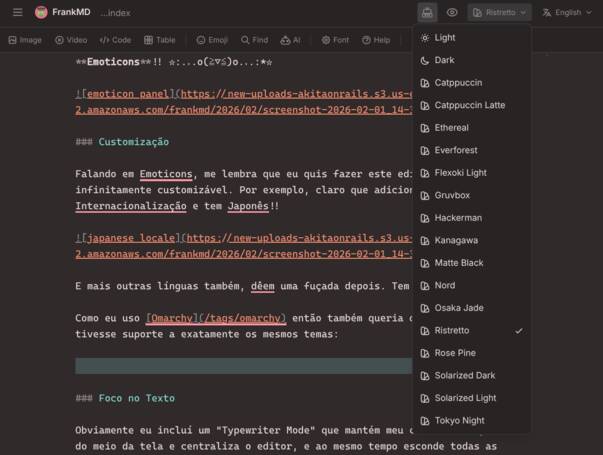
Theme picker dropdown
| Theme | Description | |-------|-------------| | Light | Clean light theme | | Dark | Standard dark theme | | Catppuccin | Pastel dark theme | | Catppuccin Latte | Pastel light theme | | Ethereal | Soft colors | | Everforest | Warm green nature theme | | Flexoki Light | Inky light theme | | Gruvbox | Retro groove color scheme | | Hackerman | Matrix-style green on black | | Kanagawa | Inspired by Katsushika Hokusai's art | | Matte Black | Pure dark minimal theme | | Nord | Arctic, north-bluish palette | | Osaka Jade | Japanese-inspired jade colors | | Ristretto | Deep coffee tones | | Rose Pine | All natural pine, faux fur and mystery | | Solarized Dark | Classic dark color scheme | | Solarized Light | Classic light color scheme | | Tokyo Night | High-contrast night theme |
Omarchy sync: If you run the Omarchy desktop environment, FrankMD detects your terminal theme and adds it as a selectable "Omarchy" option. Switching your terminal theme updates FrankMD in real time.
Change themes from the dropdown in the top-right corner. Your preference is saved to the .fed file.
Remote Access with Cloudflare Tunnel
For remote access without opening ports:
- Install cloudflared: https://developers.cloudflare.com/cloudflare-one/connections/connect-apps/install-and-setup/
- Authenticate:
cloudflared tunnel login- Create a tunnel:
cloudflared tunnel create frankmd- Add to your
docker-compose.yml:
services:
     frankmd:
       # ... existing config ...
cloudflared:
       image: cloudflare/cloudflared:latest
       container_name: cloudflared
       restart: unless-stopped
       command: tunnel --no-autoupdate run --token ${CLOUDFLARE_TUNNEL_TOKEN}
       environment:
         - CLOUDFLARE_TUNNEL_TOKEN=${CLOUDFLARE_TUNNEL_TOKEN}
       depends_on:
         - frankmd
- Configure the tunnel in Cloudflare Zero Trust dashboard to point to
http://frankmd:80
- Add your tunnel token to
.env:
CLOUDFLARE_TUNNEL_TOKEN=your-tunnel-token- Access via your configured domain (e.g.,
notes.yourdomain.com)
Development
Requirements
- Ruby 3.4+
- Node.js 20+ (for Tailwind CSS)
- Bundler
Setup
# Clone the repository
git clone https://github.com/akitaonrails/FrankMD.git
cd FrankMD
Install Ruby dependencies
bundle install
Start development server (includes Tailwind watcher)
bin/dev
Visit http://localhost:3000
Running Tests
# Run ALL checks (lint + security + tests) - same as CI
bin/ci
Run Ruby tests only
bin/rails test
Run JavaScript tests only
npx vitest run
Run specific test file
bin/rails test test/controllers/notes_controller_test.rb
Run with verbose output
bin/rails test -v
Always run bin/ci before pushing so CI has already run locally.
Project Structure
app/
├── controllers/
│   ├── notes_controller.rb        # Note CRUD operations
│   ├── folders_controller.rb      # Folder management
│   ├── images_controller.rb       # Image browsing & S3 upload
│   ├── youtube_controller.rb      # YouTube search API
│   ├── ai_controller.rb           # AI grammar checking API
│   ├── config_controller.rb       # .fed configuration
│   └── translations_controller.rb # i18n API for JavaScript
├── models/
│   ├── note.rb                # Note ActiveModel
│   ├── folder.rb              # Folder ActiveModel
│   └── config.rb              # Configuration management
├── services/
│   ├── notes_service.rb           # File system operations
│   ├── images_service.rb          # Image handling & S3
│   ├── ai_service.rb              # AI/LLM integration
│   └── omarchy_theme_service.rb   # Omarchy desktop theme sync
├── javascript/
│   └── controllers/
│       ├── app_controller.js          # Main Stimulus controller
│       ├── theme_controller.js        # Theme management
│       ├── locale_controller.js       # Language/i18n management
│       └── table_editor_controller.js # Table editing
└── views/
    └── notes/
        ├── index.html.erb     # Single-page app
        ├── _header.html.erb   # Top bar with GitHub link
        ├── _sidebar.html.erb  # File explorer
        ├── _editor_panel.html.erb
        ├── _preview_panel.html.erb
        └── dialogs/           # Modal dialogs
Building Docker Image
# Build locally
docker build -t frankmd .
Run locally
mkdir -p notes
docker run -p 7591:80 -v $(pwd)/notes:/rails/notes frankmd
License
MIT License - see LICENSE for details.
Contributing
Getting Started
- Fork the repository
- Create a feature branch (
git checkout -b feature/amazing-feature) - Make your changes following the guidelines below
- Run
bin/cito verify everything passes - Commit (
git commit -m 'Add amazing feature') - Push (
git push origin feature/amazing-feature) - Open a Pull Request
PR Requirements
Before submitting a PR:
- Rebase from master - rebase on the latest
masterbefore opening a PR. Merge commits are not accepted. bin/cipasses - run it locally. This checks rubocop style, brakeman security scan, bundler-audit, importmap audit, Ruby tests, and JavaScript tests. PRs that fail CI will not be reviewed.- Tests included - every new feature or bug fix must include tests. Ruby tests go in
test/, JavaScript tests go intest/javascript/. Untested PRs will be sent back. - Focused scope - one PR should do one thing. Don't mix unrelated changes (e.g., a new feature + linter fixes + refactoring). If you spot something unrelated to fix, open a separate PR.
Architecture Guidelines
This is a Rails 8 app. Follow Rails 8 idioms and conventions:
- Turbo Streams for server-rendered updates - file tree updates, CRUD operations on files/folders, and any server-driven DOM update must use Turbo Stream responses. Do not build HTML in JavaScript from JSON API responses.
@rails/request.jsfor fetch calls - useget,post,patch,destroyfrom@rails/request.jsinstead of rawfetch(). It handles CSRF tokens and Turbo Stream content negotiation automatically.- Stimulus Outlets for controller communication - use Stimulus Outlets (
static outlets = [...]) instead of manualquerySelector+getControllerForElementAndIdentifierlookups. - Config via
Config.get()- never readENV["KEY"]directly in controllers or services. UseConfig.new.get("key_name")which respects the.fedfile > ENV > default priority chain. Seeapp/models/config.rbfor the schema. - No sessions - this app is sessionless. Do not use
session[]for state. All persistent state goes through the.fedconfig file.
Code Style
- Ruby follows the project's
.rubocop.yml. Runbin/rubocop -ato auto-fix most issues. - JavaScript has no linter configured, but follow the existing patterns: ES module imports, Stimulus controller conventions, no semicolons.
- Keep changes minimal. Don't add extra error handling, comments, or abstractions beyond what's needed for the task.
Stats
Memory Footprint
| Component | Memory | |-----------|--------| | Rails container (Puma + Thruster) | ~115 MiB | | Browser tab (Brave/Chrome) | ~340 MB | | Total | ~455 MB |
Codebase (from bin/rails stats)
| Type | Lines | LOC | |------|-------|-----| | JavaScript | 13,793 | 10,081 | | Views (ERB) | 2,953 | 2,633 | | Models | 904 | 706 | | Controllers | 850 | 652 | | Total source | ~18,500 | ~14,100 |
Test Coverage
| Type | Tests | |------|-------| | JavaScript (Vitest) | 1,379 | | Ruby (Minitest) | 425 | | Total | 1,804 |